Sorry but you will not have a blog from me for a few months, I not only have another commission that is in the works it is also verging on the holidays so I will be busy, busy with family.
If you are a patron keep checking out art whether you prefer pastels, etching, pencil or paint and sculpture please try to keep artist in your future and if you are an artist, keep up the good work and don't hesitate to drop by or say hello.
Talk to you again in January.
Friday, September 28, 2012


Friday, August 24, 2012
Exhibiting via truck and trailor
The past two weeks have been exciting but exhausting also. I had my largest show of the year in Loveland, Colorado, the Loveland Sculpture Invitational and a new show the 17th Street Art Festival in Cheyenne, Wyoming.
This particular view is of the set up I had in Cheyenne, Wy. this past weekend. I attempt to draw viewers in by working live on a pedestal in the center of the 10 x 10 area.
You notice that I placed a large piece that drew a lot of attention in one corner at the front and another large piece at the far opposite corner in the back.
I do take a few extra pieces in order to not have an empty pedestal when one sells.
This is a view of the set up I had with the same 10 x 10 space at the Loveland Sculpture Invitational in Loveland, Colorado.
This gives a better view of how I played with the area, giving room for the patron to browse and make a circle of the entire area.
The two uses of the space allowed one to browse entirely on the outside in Cheyenne and to enter the space in Loveland.
Often you will show in different spaces, one allowing people all around you the other only allowing people to see you from the front and enter from the front (you have other artist butting up against you on either side.
This shows how I haul pedestals and in the case of the Loveland show we hauled also an atv on a flatbed to unload on the premises and hook up to the flatbed unload the pedestals and load the work (hauled both in the truck and my car) in order that we could pull onto the show grounds going from parking lot to 10 x 10 space where they did not allow vehicles.
If only I could get enough courage to drive the atv up in the pickup and use the trailer as already loaded with pedestals it would not take me so long to set up.
Yes, I realize that I could bust out the glass in the back window or roll over myself off the back so I doubt it will happen anytime soon...only in my dreams.
Each show is different and each time you may set up your space differently to allow the best view and traffic. I have exhibited in the center using two C shapes to each side with me in between allowing viewers from each side to view as they are circling tent.
I have learned over the years to allow patrons to look uninterrupted and if they are interested in a particular piece or want to strike up a conversation they will...you just have to be attentive and friendly, connect them with a piece they may be admiring by telling a story about that particular piece. Give it life and personality in their view. Otherwise you will constantly be scaring off people by trying to entertain them or carry on a conversation when all they want to do is look.
I had a great time and made new friends (both fellow artist and patrons). Had return patrons and gave them a percentage on another purchase...this is how you develop as an artist...produce and market, you can not do one without the need of the other.
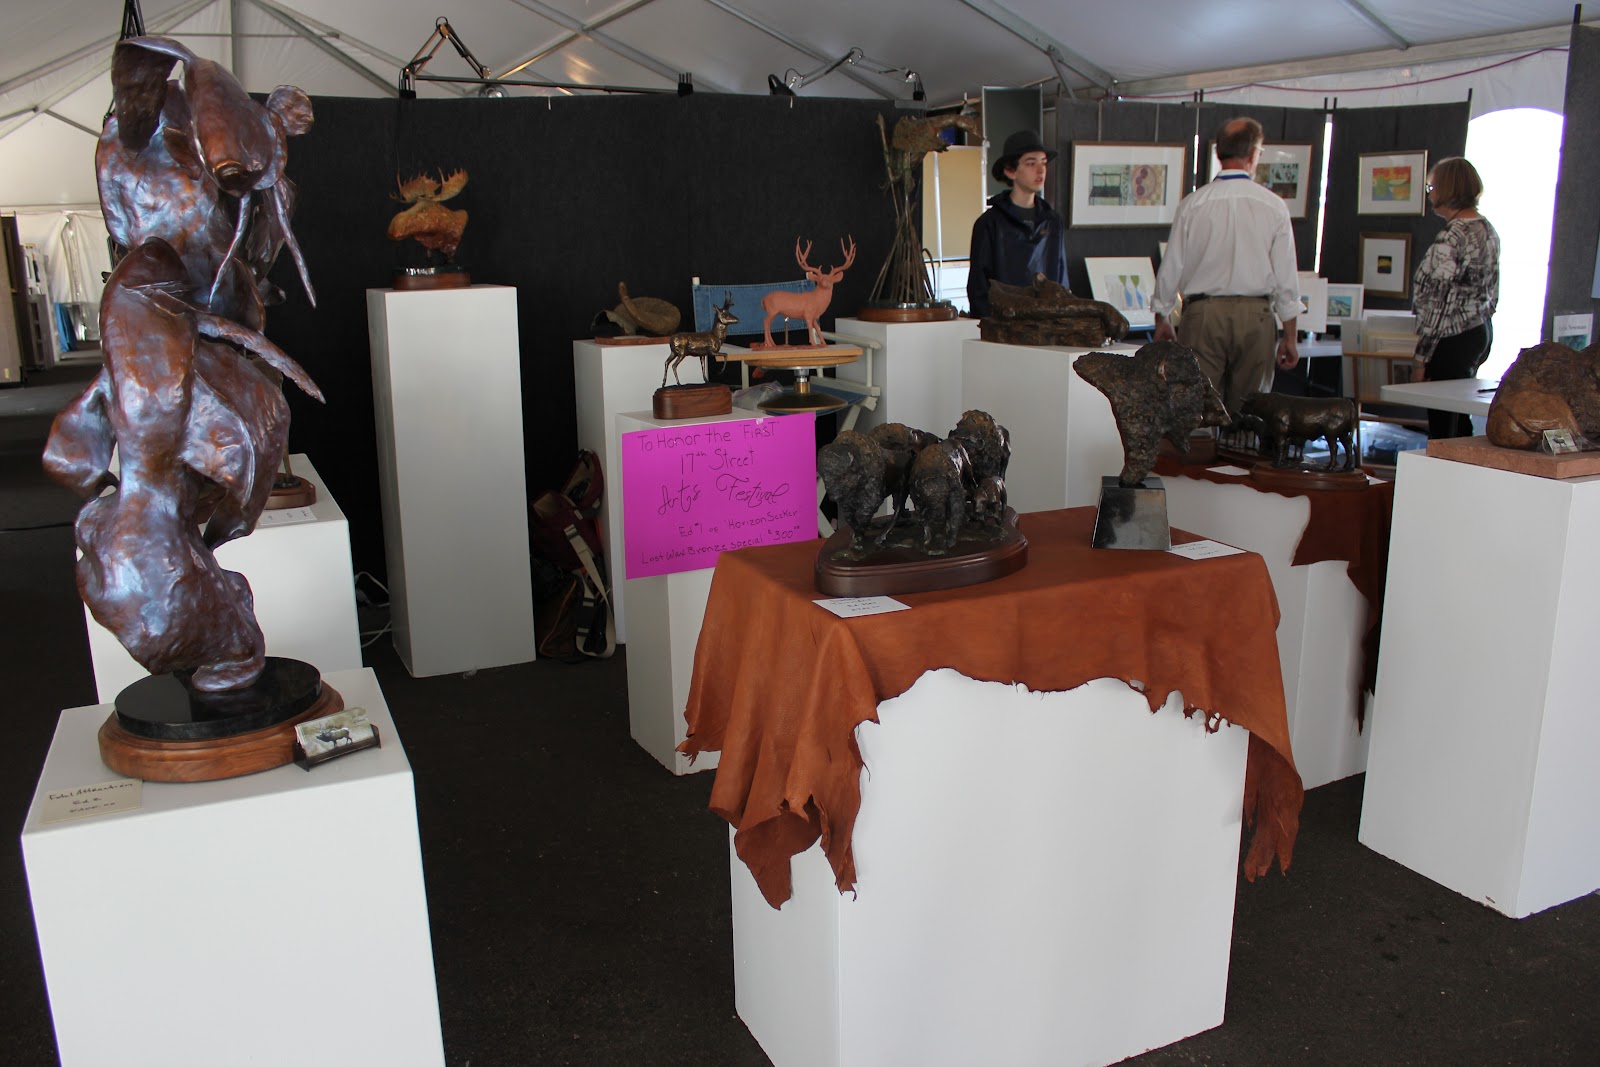 |
| 17th Street Art Festival |
You notice that I placed a large piece that drew a lot of attention in one corner at the front and another large piece at the far opposite corner in the back.
I do take a few extra pieces in order to not have an empty pedestal when one sells.
 |
| Loveland Sculpture Invitational |
This gives a better view of how I played with the area, giving room for the patron to browse and make a circle of the entire area.
The two uses of the space allowed one to browse entirely on the outside in Cheyenne and to enter the space in Loveland.
Often you will show in different spaces, one allowing people all around you the other only allowing people to see you from the front and enter from the front (you have other artist butting up against you on either side.
 |
| I haul 12 or more pedestals to shows in order to get the look I want |
If only I could get enough courage to drive the atv up in the pickup and use the trailer as already loaded with pedestals it would not take me so long to set up.
Yes, I realize that I could bust out the glass in the back window or roll over myself off the back so I doubt it will happen anytime soon...only in my dreams.
Each show is different and each time you may set up your space differently to allow the best view and traffic. I have exhibited in the center using two C shapes to each side with me in between allowing viewers from each side to view as they are circling tent.
I have learned over the years to allow patrons to look uninterrupted and if they are interested in a particular piece or want to strike up a conversation they will...you just have to be attentive and friendly, connect them with a piece they may be admiring by telling a story about that particular piece. Give it life and personality in their view. Otherwise you will constantly be scaring off people by trying to entertain them or carry on a conversation when all they want to do is look.
I had a great time and made new friends (both fellow artist and patrons). Had return patrons and gave them a percentage on another purchase...this is how you develop as an artist...produce and market, you can not do one without the need of the other.
Monday, July 23, 2012
Art Demo's in Public

I was involved with a studio Creations, Art and Gifts in Louisville, Colorado and they were nice enough to let me demo in a tent outside during an art walk.
What you have to remember when you are introducing your particular medium to non-artist is that many do not have a clue as to the process.
I have been asked many times how I paint the metal onto the clay object and I am tickled to introduce them to the fascinating process of lost wax casting.
During a demo, I not only try to show them the creative process of the artist conception in clay but also the remainder of the process as referring to the mold, casting, metal chasing and patina. I try to explain that I am not the only artist that touches my work and I often refer to the other artist as my team because without them I would not be able to complete my work.
I usually take with me clays, waxes, molds and raw metal if available to show them as many examples of each process as possible.
I also invite them to take a tour at one of the foundries in Loveland (they give wonderful explanations of the process).
I have done demo's also during important shows such as the Loveland Sculpture Invitational coming up here soon in Loveland, Colorado. When you have three days to talk you find all kinds of questions and almost form relationships with patrons letting them into your private world of creating. Don't sit back and just let them look at things, talk, talk and talk. A relationship with a patron is important in the sale of your work, they must feel a connection with you in order to feel connected with your work. Show the passion!

Thursday, June 21, 2012
Pouring waxes "the good, the bad and the ugly"
 | ||||||
| Preparing Mold |
You can not tell but I already have had my cookers on for several hours, which is what it takes to melt all my wax down to where there are no clumps or chunks on the bottom and as they are melting down I clean all my spoons and dipping pans. Make sure your dipping pan has a pour dent.
You actually have to start the roasters out at around 400 degrees to get it to all melt then you begin backing it off to the temperature you desire, one tub is 200 degrees and the other is anywhere from 180 to 160 depending on what I am pouring. I have thermometers in each roaster (which you can see in the second picture) showing me the constant temperature.
Some molds are actually small enough that you can do them the way I am doing but then other times they are too large and you need two people one to pour and the other to support and roll the mold. Also notice that I have a heavy apron on the protect me from splatters of hot wax and a bowl of water in between the roasters just in case I have to dip my hand in to cool or peel off the hot wax.
 | |
| actually pouring into small mold |

You have to pour the first 200 degree wax into the mold and fill it all the way to the top, shake it a tiny bit to get the hot wax to go into feet and tiny details (horns if applies) and especially rotate it towards things like noses or tails. Then as you start to rotate your mold and tip it to empty the hot wax you make sure you are covering every square 1/2 inch of pour spout to show you that you have evenly distributed the hot wax all the way around as you rotate and tip to pour it out.
I usually pour two of the 200 degree and then two of the 170 or so temperature making sure to get the complete rotation of the work to where the thickness is the same all the way around.
The most important is of course the 200 because it is picking up the tiny details and if poured too fast it will be the one to create bubbles or if you pour too slow it will show the ripple affect on the side of our wax when you pop it out of the mold. You want your wax around the 1/8th of an inch thick all around the work.
There will be cases where you will have a tiny piece and only pour one pour and it will be solid. I make all my horns (because I work desktop and small) solid where they will handle the sprueing and preparation of the crust mold that is produced before casting.
Where I have found problems is when I have created something for instance an animals curled up that creates a cavity in the center then that will be a hill or high point in your mold (you are looking at the inside). You will actually at the end of pouring the four times have to cool your wax even further and spoon a little at a time to cover the "protruding areas" or high spots or you will have a hole there.
Wednesday, June 6, 2012
Just wondering
It seems most of my views that are on the post I am explaining a technique that I use or something I am working on, I could use some feedback on what it is my viewers would like to see or would be interested in watching me do.
I realize that the times you are reading me you are away from your own creating or personal time so I want it to matter. Let me hear from you and if I can possibly help or explain I will. I was recently talking with a woman that works in another medium and was curious about the process of lost wax, I steered her in the blog direction but I also remind people that only by going back to the very beginning of the blog can they get all the necessary steps of clay to bronze.
I have recently been searching for a new camera, digital and a new experience for me so wish me luck and I would welcome any advice from any artist currently using one. I use mine not only for long shots of animals for research but close up of details and also my online submissions.
I realize that the times you are reading me you are away from your own creating or personal time so I want it to matter. Let me hear from you and if I can possibly help or explain I will. I was recently talking with a woman that works in another medium and was curious about the process of lost wax, I steered her in the blog direction but I also remind people that only by going back to the very beginning of the blog can they get all the necessary steps of clay to bronze.
I have recently been searching for a new camera, digital and a new experience for me so wish me luck and I would welcome any advice from any artist currently using one. I use mine not only for long shots of animals for research but close up of details and also my online submissions.
Wednesday, May 30, 2012
Just thinking.....
If you have checked in on me very often you remember I love finding quotes and ran across this gem. "When you move forward with passion about what you know, what you don't know won't paralyze you." author unknown
When I think about 17 years ago and whether or not I should have or should not have started sculpting it puzzles me as to how I thought I had the guts to jump into something at that point in my life when most people would have been thinking of ways to live an easier life.
Sure there were a lot of things through the years that if I did not know I had to either ask about or experiment until I found a solution. Some things just had to be done rather than explained because it was the feel of something not necessarily the explanation of how to do it.
In the old days there was a clay that was probably one of original oil clays (Plastilene) and I began in California with it...until the first time I wiped my eye with a dirty hand and the burning from the residue of the clay made me start my search for another clay quickly. Most of the time it is the effectiveness of a product, or the smell or residue of a product that turns me against it.
Also in the old days we used to do plaster molds by the old method of a large bucket of water and putting your plaster in until it started to "hill" then we kept eyeballing it until it was time to add the fiber glass. I played with silicate sand in sandblasting not knowing it would be later found to cause cancer and cut stained glass letting chips fall where they did not knowing some would remain in my skin and cause little bumps when skin grew over them.
When you are young you are fearless.....and a little dumb!
Now I am smart enough to know that certain products are not good inhaled or handled bare handed. Often I have to move something that is too heavy and I know better but no one else is around, that is knowing better but doing it anyway....also dumb.
So just to let you younger artist know, we all start out with a dream and learn along the way but don't ever let your fear of failure place blinders on your creativity.
Want to close with another favorite that I ran across that I feel we have always wanted to do as an artist and maybe on a personal level also....we all wish we could do that fantastic monumental piece of art but we need to know that all our small endeavors are important to someone also.
"I long to accomplish a great and noble task, but it is my chief duty to accomplish small tasks as if they were great and noble." Helen Keller
Regardless of the work being accomplished, do your best and always work with pride...art is forever and it so speaks of our society as a whole.
When I think about 17 years ago and whether or not I should have or should not have started sculpting it puzzles me as to how I thought I had the guts to jump into something at that point in my life when most people would have been thinking of ways to live an easier life.
Sure there were a lot of things through the years that if I did not know I had to either ask about or experiment until I found a solution. Some things just had to be done rather than explained because it was the feel of something not necessarily the explanation of how to do it.
In the old days there was a clay that was probably one of original oil clays (Plastilene) and I began in California with it...until the first time I wiped my eye with a dirty hand and the burning from the residue of the clay made me start my search for another clay quickly. Most of the time it is the effectiveness of a product, or the smell or residue of a product that turns me against it.
Also in the old days we used to do plaster molds by the old method of a large bucket of water and putting your plaster in until it started to "hill" then we kept eyeballing it until it was time to add the fiber glass. I played with silicate sand in sandblasting not knowing it would be later found to cause cancer and cut stained glass letting chips fall where they did not knowing some would remain in my skin and cause little bumps when skin grew over them.
When you are young you are fearless.....and a little dumb!
Now I am smart enough to know that certain products are not good inhaled or handled bare handed. Often I have to move something that is too heavy and I know better but no one else is around, that is knowing better but doing it anyway....also dumb.
So just to let you younger artist know, we all start out with a dream and learn along the way but don't ever let your fear of failure place blinders on your creativity.
Want to close with another favorite that I ran across that I feel we have always wanted to do as an artist and maybe on a personal level also....we all wish we could do that fantastic monumental piece of art but we need to know that all our small endeavors are important to someone also.
"I long to accomplish a great and noble task, but it is my chief duty to accomplish small tasks as if they were great and noble." Helen Keller
Regardless of the work being accomplished, do your best and always work with pride...art is forever and it so speaks of our society as a whole.
Wednesday, May 16, 2012
Lab pup, cute or artistic?
There is always quite a conversation on what exactly is art and whether an artist should do "cute" pieces or should they do creative, artistically unique work.
This is a problem for artist that do representational work because we constantly float between doing what we think people will love and what we love ourselves or experience. I happen to love labs and we have had quite a few wonderful dogs.
In your lifetime you will see moments that tug at your heart that you just want to freeze and this particular moment that I have tried to capture here is just that moment.
I worked this up in Chavant clay and used an armature that is fairly large to capture the awkwardness of this pup. The trouble with puppies is that they do not stay the same size long at all so you are either constantly hurrying or you constantly change your design as the pup changes. My thought is to work fast and be able to catch the moment within the week or two that you desire. Measure, measure and take photo's of every little detail...remember people that will be attracted to this piece love labs and pups and will know if anything is not right.
This is a problem for artist that do representational work because we constantly float between doing what we think people will love and what we love ourselves or experience. I happen to love labs and we have had quite a few wonderful dogs.
In your lifetime you will see moments that tug at your heart that you just want to freeze and this particular moment that I have tried to capture here is just that moment.
 |
| First Retrieve |
Subscribe to:
Posts (Atom)